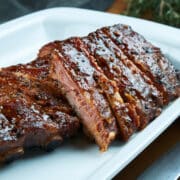
Besides a grill or smoker, the oven method is one of the simplest and fool-proof ways to cook delicious ribs! The results are incredibly delicate and juicy when cooked low and slow at 225 degrees, and any home cook (ask around) will tell you that this is the optimum temperature for oven-baked rib recipes.
One of the most important things to note is how long to cook ribs in the oven for the best results, and that is exactly what this article is here to show you. Pay attention to all our cooking tips and instructions, as well as our timing guidelines in order to get the best out of your cooking.
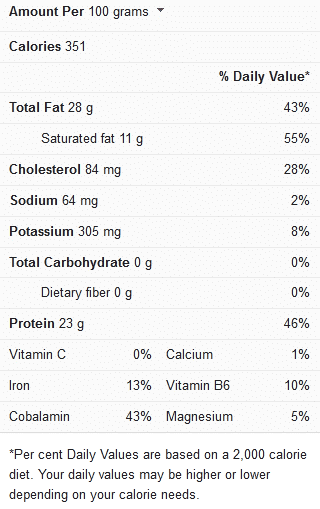
Ribs nutrition facts

Tips for cooking ribs in oven
We recommend that you pay attention to the tips and guidelines below to get the best results when cooking ribs in the oven:
Don’t wash the ribs – Before cooking, ribs technically don’t need to be washed. This step is not recommended by the USDA since it increases the danger of cross-contamination.
Take off the membrane – The membrane on the ribs should be removed before cooking. Failure to do this will result in the ribs being much more difficult to take apart and eat after they’ve been cooked. The membrane is a thin, whitish coating that runs down the back of the ribs. Simply raise the corner with the point of your knife and pull it off slowly.
Ideal cooking duration – Ribs cooked in the oven with this method typically take around 6 hours to cook completely. In the end, you want your ribs to achieve an interior temperature of 190–200 degrees Fahrenheit.
You can generally eat ribs safely once they reach a temperature of 145 degrees Fahrenheit, but the flesh would still be considerably tough at this point. The flesh is at its softest and juiciest when the ribs reach an internal temperature of 190–200 degrees F.
View this post on Instagram
Cooking time for ribs in oven at 225
The ideal timing guidelines to follow when cooking ribs in the oven have been described in the table below:
| Cooking procedure | Cooking time |
| Cooking ribs in the oven | 3 hours at 225 degrees Fahrenheit; 2 to 3 hours at 180 degrees Fahrenheit |

Oven slow-cooked BBQ spare ribs (1 serving)
Ingredients
For the rub
- 1 cup of brown sugar (dark or light)
- 3 tablespoons of smoked paprika
- 2 tablespoons of dried ground chipotle or ancho chile powder
- 1½ tablespoons of garlic powder
- 1½ tablespoons of onion powder
- 1 tablespoon of kosher salt
- 1 teaspoon of ground cumin
For the ribs
- 1 rack of spare ribs; preferably St. Louis Cut (or as many as you need)
- barbecue sauce of choice for garnish; (this ingredient is optional, but you’ll find it beneficial)
Instructions
Note: The first three steps of this recipe should ideally be completed several hours before the ribs are to be cooked. The uncooked ribs should be refrigerated overnight after coating them in the rub.
- Prepare the rub the night before you plan to cook the ribs: Combine all ingredients in a large mixing bowl and stir well until completely combined.
- Afterwards, coat the ribs as follows: Take the spare ribs out of the package. Clean them by rinsing them, then pat them dry. Remove any extra fat attached to the ribs. It’s advised that you chop the ribs in half to make them simpler to handle (simply slice into the middle of two ribs to get this done). Apply the rub to the two sides of the ribs using your hands, focus on the meatier side during this process. You should use a minimum of ¼ cup of the rub, although more can be used if desired.
- Put the ribs inside a sturdy food-storage bag (freezer bags work well for this), push out enough air (as much as possible), and close the bag tightly. Refrigerate the ribs this way for at least one night.
- Heat up your oven to 225 degrees F, do this before you begin to cook the ribs, but ensure that you have taken the ribs out of the refrigerator half an hour before this time.
- Enclose the ribs within aluminum foil to keep them warm. Place the ribs with the bony side facing downwards (and the meaty side up) on a sheet pan, then leave them to bake in the preheated oven. Make sure your timer is set for three hours.
- Take the sheet pan containing the ribs out of the oven as soon as the timer beeps. Pull a portion of the foil gently aside, then place an instant-read thermometer’s probe between two bones in the meaty area of the ribcage (make sure to avoid contact between the bone and the probe; the bone will typically register a hotter temperature than the meat).
- Continue with the next step if the thermometer registers 170 degrees F. If not, then you need to rewrap the ribs and put them back into the oven if they aren’t done yet. In a half-hour or so, double-check them. (Choose how much additional time to leave the ribs in the oven based on your own discretion). If the ribs have reached 165 degrees, then you’ll know that they will require significantly less additional time compared to being at 150 degrees.)
- Turn down the oven’s temperature to 180 degrees F and set 2 or 3 hours on your timer once the ribs have reached 170 degrees F. (At this point, the ribs are “done,” but additional cooking removes more of the cartilage component, resulting in more tender ribs).
- Take the ribs out of the oven once the timer goes off. Preheat the oven to broil mode. Take the aluminum foil off the ribs (do this carefully — there will be liquids), brush the ribs with a thin layer of barbecue sauce, and broil them till the barbecue sauce just starts to burn, about 10 minutes. If you enjoy burnt ribs, you might want to cook the ribs a little longer.
- Take the ribs out of the oven, then cut them into single servings on a cutting board (at this point, the meat will have a fall-off-the-bone quality, so the cutting process should be easy). Serve the ribs with barbeque sauce on the side.
The entire cooking time for this oven-baked rib recipe is 5 to 6 hours, excluding the prep time. This may seem like a lengthy period but the best results with oven-baked rib recipes come from cooking them low and slow.
If you’d like to see more recipe ideas for ribs in the oven, then we recommend checking out this video recipe.
