A Ninja Foodie is the perfect kitchen appliance for you if you’d rather not have your countertop littered with so many appliances at the same time. This is because it combines the functions of an air fryer, pressure cooker, and a rice cooker into a single piece of equipment, amazing right?
Rice is also one of the easiest things to make in a Ninja foodie, so if you’ve been looking for a different way to cook rice, you have your answer!
In this article, we’ll show you the best way to achieve well-cooked fluffy rice by using a Ninja Foodi. Make sure to pay attention to all the helpful tips and guidelines we’ve outlined in this article to achieve the best possible results.
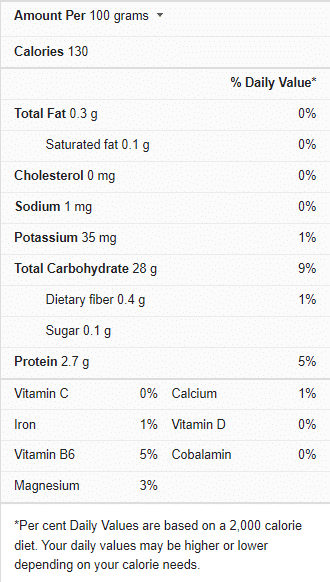
Rice nutrition facts

Tips for cooking rice in ninja foodie
We have provided a number of helpful tips and cooking instructions below, so keep them in mind when cooking rice in a Ninja Foodi:
Necessary ingredients – You’ll be needing the following ingredients to cook rice in a Ninja Foodi:
- Rice: This cooking method will essentially work with most long-grain rice varieties. For any sort of rice, follow the fundamental recipe procedures. To acquire the best results, simply adjust the quantity of water, the length of time for the pressure cooking process, and the length of time for natural pressure release.
- Water: Water is required in a basic recipe. However, if you prefer to introduce a bit of extra flavor to your rice, you can opt for vegetable or chicken broth instead. This basic white rice recipe calls for 2½ cups of water, which is usually a sufficient amount to make the rice light and fluffy.
- Salt: Although this is an optional ingredient, feel free to include it in your recipe for added flavor.
A note on rinsing – In theory, it’s ideal to wash your rice in order to remove any excess starch. The excess starch causes the rice to become sticky and the grains to stick together. Some people, however, claim that they didn’t have to wash their rice before cooking it in a Ninja Foodi. Stovetop rice frequently comes out gummy and sticky. The rice made in Ninja Foodie, on the other hand, did not turn out sticky at all, even though they did not wash it.
For fluffier results – Cook the rice immediately you add the cooking liquid and other ingredients to the Ninja Foodi pot. Leaving the rice to soak in water before you pressure cook will cause the water to rice ratio to be wrong.
If the rice is excessively wet after cooking, let it sit aside for a few minutes with the lid on top but not fastened. This will aid in the rice’s absorption of any excess moisture.
Ideal timing – Different types of rice take varying amounts of time to cook in a Ninja foodie. It is best to follow the timing guidelines we have outlined in the section below, in order to get the best out of your recipe. Also, make sure to take note of the ideal timing for natural pressure release.
Opt for natural pressure release – It’s best to allow the pressure to discharge naturally for 10 minutes when cooking white rice in a Ninja Foodi. Afterward, to quickly release the remaining pressure, set the pressure release valve to vent. When turning the knob, take care not to put your hand over the steam valve so that you don’t get burned.
Try using the end of a butter knife or a spoon, or approach your Ninja Foodi from the front, but whatever you do, don’t place your hand over the top!
Ideal way to store and reheat cooked rice – Place the rice in an airtight container or freezer bag after it has totally cooled. Do not overcrowd or cram the rice into the container. It takes a little breathing room for the rice to stay beautiful and fluffy. Before packaging the rice, portion it out as well. If you freeze 4 cups of rice but only want to reheat 1 cup, it will be difficult to separate them once they have been frozen, so keeping them in separate portions is ideal.
When ready to eat, simply place the frozen rice in a microwave-safe container with one or two tablespoons of water, cover, and cook for 1 minute. You may need to add another minute or two depending on how much rice you’re thawing.
View this post on Instagram
Cooking Time for Rice in Ninja Foodie
The ideal amount of time for cooking rice in a Ninja Foodi has been described in the table below:
| Type of rice | Cooking time in a Ninja Foodie |
| White rice (2 cups) | 2 minutes; 10-minute natural release |
| Brown rice (2 cups) | 15 minutes; 5-minute natural release |
| Wild rice (2 cups) | 30 minutes; 15-minute natural release |
| Jasmine rice (2 cups) | 3 minutes; 10-minute natural release |

Ninja foodi rice (4 to 5 servings)
Ingredients
- 1 cup of white rice, washed if you prefer
- 1 ¼ cup of chicken broth
- ¾ tablespoon of salted butter
- ¼ teaspoon of salt
- ¼ teaspoon of pepper
Instructions
- Stir together the rice, broth, salt, butter, and pepper in the Ninja Foodie insert pot.
- Close the pressure cooker lid and set the valve to seal.
- Cook the rice for 3 minutes on high pressure.
- When the timer beeps, let the pressure out naturally for 10 minutes before quickly releasing the remaining pressure.
- Remove the lid from the pressure cooker.
- Using silicone or wooden spatula or fork, stir the rice. It’s not advisable to stir with a spoon because this tends to split up the rice, even more, causing the grains to clump together and become mushy. Set the lid back on the pressure cooker and leave the rice to sit for a few minutes longer if you find that it’s uncooked to your preference. During this period, make sure the Ninja Foodi is turned off. The steam in the pot should be sufficient to continue to cook the rice.
- Your rice is ready! Enjoy whatever sides of your choosing
Rice is so easily cooked in a Ninja Foodi and the cooking process is also really quick. You can actually get your rice from raw to delicious in 3 minutes with a Ninja Foodi, so this is a recipe we definitely recommend for ease and delicious results.
If you’d like to see more recipe ideas for cooking rice in a Ninja Foodi, please check out this video recipe.
