Preparing a spiral sliced ham is one of those cooking techniques you can be confident will yield delicious results if the proper cooking guidelines are followed. There are several tips and tactics you can use to make your cooking successful and to ensure that your ham is cooked to a soft and juicy consistency, perfect from start to finish, including leftovers.
Apart from teaching you the ideal length of time to cook your ham in order to get the best results, this article will provide useful tips to ensure that you get the best out of your cooking, and so that the ham is mouthwatering at the end of your cooking.
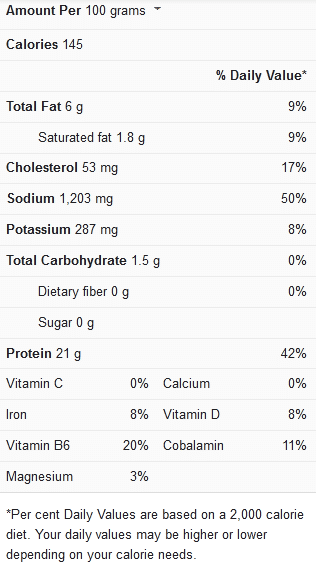
Ham nutrition facts
Tips for cooking spiral sliced ham
Here are some really helpful tips to keep in mind when cooking a spiral-sliced ham:
Timing your cooking – The ideal timing guidelines for cooking a spiral-sliced ham typically depend on the ham’s size. It is advised that you increase the cooking time by 10 minutes per lb of ham you’re cooking in the oven. Make sure to take note of the timing guidelines in the table below for the best results with spiral sliced hams.
Keeping your ham moist while serving – The most ideal approach to keeping your ham moist is to prepare it properly in the first place. Overcooked ham will dry out on the table more rapidly.
The second best method for serving moist ham is to put just enough on the platter. Wait a while after the plate has been passed around and everybody has had a slice before refilling it. Ham that is served open-faced on the counter will most likely dry up faster than a whole ham in the kitchen that has been covered with aluminum foil.
Other ways to ensure moist results, especially during cooking, have been listed below:
- To cook the ham, save the ham juices and combine them with the chicken broth.
- Cover the ham completely using aluminum foil, make sure to fasten it snugly to the roasting dish.
- Invest in a good roasting pan.
- Select your glaze and add it to the ham at the appropriate moment.
- Cover the ham until it’s ready to eat, and keep the leftovers covered to preserve their moist quality.
- After you take the ham out of the oven, baste it with the juices several times. This will help your ham retain moisture. Also just before removing the slices to place on the serving platter, baste it again.
View this post on Instagram
Cooking Time for Spiral Sliced Ham
The ideal timing guidelines for cooking spiral sliced hams in the oven have been described below:
| Ham size | Cooking time in the oven |
| 5 to 7 lbs | 50 minutes to 1 hour and 10 minutes |
| 8 to 10 lbs | 1 hour 20 minutes to 1 hour 40 minutes |
| 11 to 12 lbs | 1 hour 50 minutes to 2 hours |

Spiral sliced ham (8 servings)
Instructions
- Remove the ham from the package, making sure to save the liquids that will be contained within the shrink-wrapped covering that will be placed over the ham.
- Save the label (which should include the instructions for handling the ham), the glaze packet, and the ham’s weight tag as well. Keep them in a convenient location where you may use them often if necessary.
- Heat up the oven to 325 degrees Fahrenheit and adjust the oven rack to set the ham at the oven’s center.
- In a baking dish, set up the ham. To get the maximum flavor, place the fat side up.
- Pour the ham’s remaining juices into the baking pan‘s bottom, and if there isn’t enough juice (at least ½ a cup), add ½ cup of chicken stock.
- Heavy-duty aluminum foil should be used to wrap the ham tightly. If a piece of aluminum foil isn’t sufficient, use several pieces. Cover the ham with aluminum foil and fasten it to the upper edges of the roasting pan. Ensure sufficient tightness, enough to prevent leakage.
- Read the directions provided with your glaze packet to learn how and when to apply the glaze.
- Cook the ham in the oven for the time indicated in the table above (depending on the size and weight of your ham) or if you prefer, follow the time/temp directions included with your ham.
- Add the glaze to your ham as per the package directions (you’ll need to glaze the cut surface of the ham). Turn the ham over if that surface is facing down in the pan). If you’re using the glaze recipe indicated, do so about 10 minutes before the ham gets done cooking. This should ideally be after turning the ham over so the sliced side is up, covering it with foil, and returning it to the oven to complete baking.
- Take the ham out of the oven when the timer goes off, but keep the foil on the ham until it gets cool enough to handle.
- Make sure the cut surface is facing upwards when it’s cold enough to handle. Spread the drippings from the pan over the ham with a ladle or basting bulb. Ensure that some of the fluids make their way down into the ham slices.
- Baste the ham once more just before serving. Ensure the dish is still warm while serving.
If you’d like more recipe ideas for a spiral sliced ham, then you may want to check out this video recipe.
Notes
If you would rather not use the included glaze packet in your recipe, then try making yours with the ingredients listed below:
- 1 cup of pineapple juice
- 1 cup of brown sugar
- ⅔ cup of maple syrup
Pour the resulting mixture from these ingredients over the ham 30 minutes before it’s done (make sure to separate the slices a bit, then ensure that the mixture runs down through the slices). Afterwards, cover the ham again with aluminum foil and return it to the oven to complete cooking.
This mixture will be extremely sticky, so take note of this when handling it. Something essential to keep in mind is to avoid overcooking the ham. Make sure it stays covered securely after you take it out of the oven, then baste it again before serving.