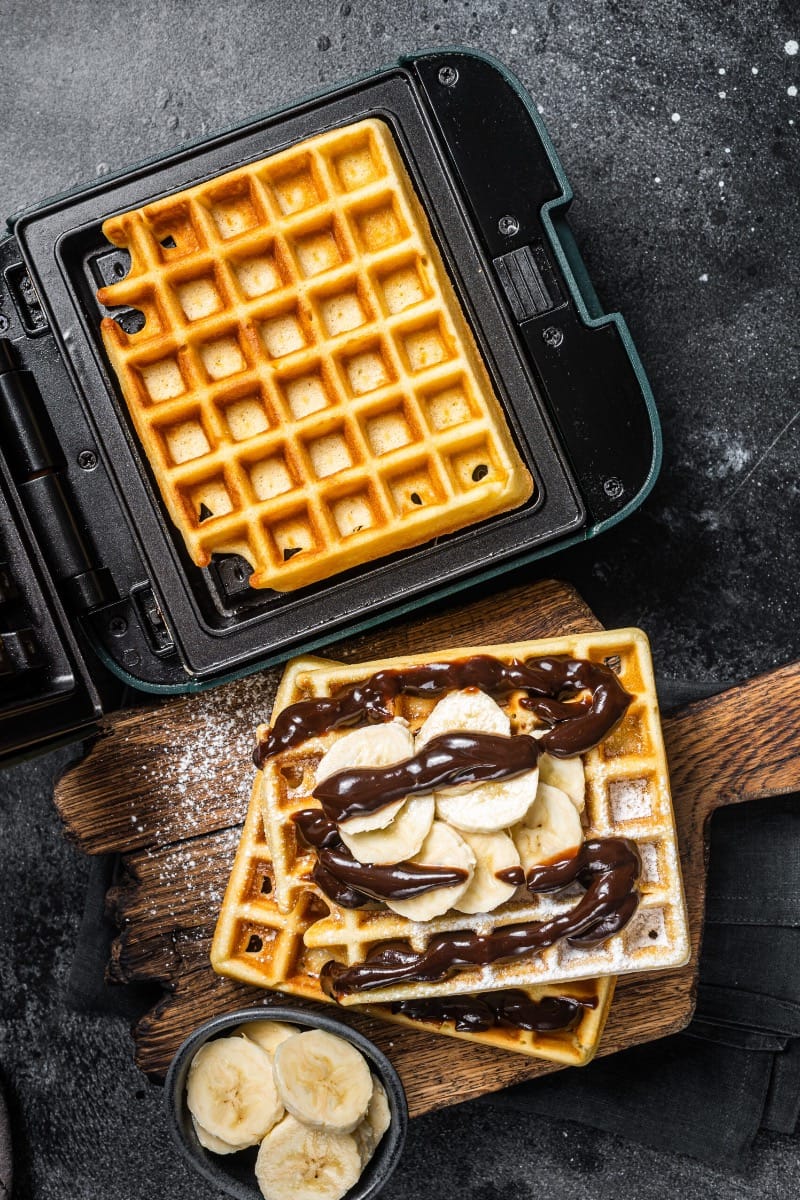
Waffles are a popular breakfast item; you’ll find that they are loved by many people. You can quite easily purchase frozen versions and toast them, but homemade waffle versions are far superior. You’ll need a waffle maker whether you decide to make your waffles from scratch or from a boxed mix.
You’ll be unstoppable with waffle recipes as soon as you figure out how to use a waffle maker to make waffles. This is why we’ve compiled some cooking instructions, tips, and timing guidelines to help demystify the process and provide some insight into ways to get satisfactory results.
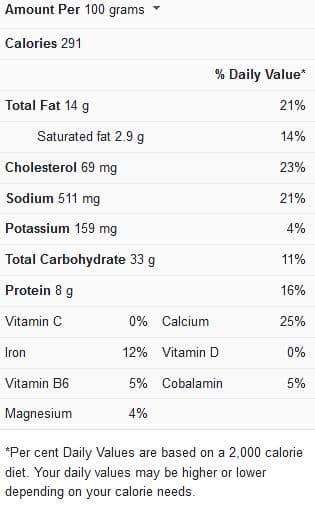
Waffles nutrition facts

Tips for cooking waffles in waffle maker
Take note of the following tips and suggestions if you want to achieve desirable results when making waffles with a waffle maker:

Mind the instructions for your waffle maker – It is important that you read your waffle maker’s instruction manual thoroughly. This equipment has been designed to cook waffles in a variety of ways. Some instruction manuals may recommend spraying your waffle maker using cooking spray, and it’s likely that your manual will give you different recommendations. Cooking spray should not be used if your waffle maker was purchased within the last five years.
For non-stick waffles – Whether your waffles will cling to your waffle maker or not is mostly controlled by the quantity of oil or butter contained in your waffle batter. If your waffles are sticking all of the time, try raising the amount of oil or butter you’re using in your recipe.
Keep egg whites and yolks separate – If you want the insides of your waffles to be light and fluffy, it’s necessary to separate your eggs. Toss the beaten yolks into the batter’s wet components. The egg whites should next be whisked until stiff peaks are formed. Afterward, working with a spatula, carefully fold the egg whites into the final batter.
Don’t mix your batter violently – Waffle batter can be quite tricky to work with. Ideally, the batter should be sufficiently smooth to run easily over the waffle plate’s dimples but never over-mixed (over-mixing will make the flour turn into gluten, resulting in a chewier less-fluffy texture in the end results).
Gentle patience is thus the answer. Mix the wet elements of the butter mixture into the dry components with a rubber spatula (you may use a spoon if you don’t have a spatula) as though the batter included little, breakable pieces that you want to avoid breaking. Use gentle motions to mix the batter till it gets smooth, this may take a few extra minutes, but the results will be worth it.
There’s no need for buttermilk if you don’t have it – Buttermilk is used in a number of the more intriguing waffle recipes. Most people, however, tend not to have buttermilk on hand. Buttermilk can always be replaced with regular milk, and the texture variation in the finished waffle is insignificant.
If you’re missing the tanginess of buttermilk, you can make a simple buttermilk alternative by mixing a tablespoon of lemon juice or vinegar into a cup of milk. Milk will curdle due to its acidic component. After standing for 15 minutes, it’ll be ready to use in your waffles. You may even find that you prefer lemon juice’s characteristic freshness in your waffle recipes.
Avoid lifting the lid before it’s time. As a rule of thumb, it’s always ideal to wait until the waffle maker indicates that your waffles are ready via its indicator light or buzzer mechanism before lifting the lid. If your waffle is stuck to the plates, raising the lid too soon may cause it to tear, leaving one half attached to the top of the waffle maker and the other half stuck to the bottom.
Cooking time for waffles in waffle maker
The ideal timing for waffles in a waffle maker has been described in this table below:
| Cooking procedure | Cooking time |
| Cooking waffles in a waffle maker | 2½ minutes |

Perfect homemade waffles (10 servings)
Ingredients
- 2 cups of all-purpose flour
- ¾ cup of granulated sugar
- 3 teaspoons of baking powder
- ¼ teaspoon of kosher salt
- 2 large eggs whites and yolks, separated
- 1 cup of buttermilk
- ½ cup of skim milk, other kinds can work too
- 1 cup of unsalted butter, melted
- 1 teaspoon of pure vanilla extract
Equipment
- Waffle Iron
- mixing bowl
- Whisk
- measuring cups
For the Classic Buttermilk Syrup
- 1 stick of unsalted butter
- ½ cup of granulated sugar
- ½ cup of buttermilk
- ½ teaspoon of baking soda
- ½ teaspoon of pure vanilla extract
Instructions
- Your waffle iron should be preheated. While this is ongoing, in a large mixing basin, combine the flour, sugar, baking powder, and salt. In a mixing bowl (medium-sized), beat egg whites constantly until stiff peaks are formed.
- Whisk together the buttermilk, melted butter, milk, vanilla, and egg yolks, then slowly add in the dry ingredients. Fold in the egg whites until they are barely blended.
- Scoop and pour ½ cup of the batter in the waffle iron’s center, cover the waffle maker, and cook the waffle until it turns golden brown and crunchy, this should take about 2½ minutes depending on the kind of waffle iron you’re using. Place the hot waffles on a cooling rack. Continue to cook waffles until all of the batters have been utilized.
- Butter, sugar, and buttermilk should be combined in a small saucepan afterward to make the buttermilk syrup for the topping. Stir the mixture until the butter has melted and the mixture has come to a gentle boil. Remove the pan from the heat and mix in the vanilla extract and baking soda. The syrup will froth. Allow it to sit for a few minutes, keep stirring regularly until the foam has subsided. To serve, arrange waffles on plates, top with desired fruit, then drizzle the warm buttermilk syrup over the waffles.
This recipe for waffles in a waffle maker is quick and easy, and it also delivers such delicious results that your family is sure to enjoy. The entire cooking duration for this recipe is 20 minutes, including a prep time of 15 minutes and a cook time of 5 minutes.
In case you need more ideas and inspiration for waffle recipes using a waffle maker, we suggest that you watch this video recipe.
