When caught, crab legs are mostly steamed before they’re flash-frozen for storage. And we regularly come across recipes instructing that you thaw frozen crab legs before you cook them. But what if you can’t spare the extra waiting time or didn’t get the chance to defrost seafood? Or you did but can’t access a standard steamer at the moment?
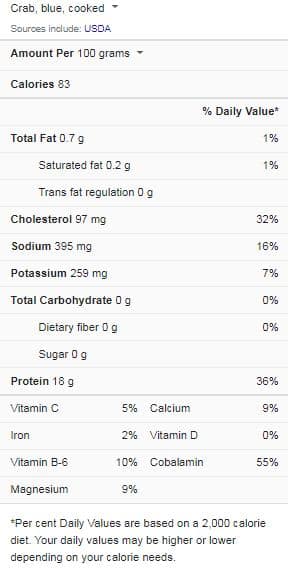
Crab nutrition facts

Since steamers are specially designed to cook food by releasing steam into it, you may fear you can’t do without one. But the beauty of recipes is with an open mind; you’ll always find new ways to make the same old stuff. Steaming frozen crab legs are no exception, as even without a steamer, you can still cook the seafood without thawing. And here are four impressive and convenient ways to do it;
By stovetop steaming
If you have a pot and some foil, you can quickly create makeshift steaming equipment to cook frozen cab legs on the stove. What you do is forge three balls of about four inches in diameter from foil and arrange them at the bottom of a saucepan. Next, add some water to about three inches of the pot, place the pot on the stove and let it boil. Then, place the frozen crab legs on the foil balls, cover the saucepan, and leave it to steam for about seven to 14 minutes.
By oven-steaming
An oven is also very convenient for cooking frozen crab legs. Plus, with it, you can prepare a large batch simultaneously while you make the other dishes on the stovetop. To use the oven, first set it to preheat to 350F. Next, lay the frozen crab legs in a baking dish and add some water- about 1/8 inch. Then, seal the pan with heavy-duty foil and toss it in the oven. Leave it to cook for about eight to 10 minutes.
By grill-steaming
Many foods can be steamed on a grill rack, whether indoor or outdoor, including crab legs. The trick is the same as any other, wrapping it in foil and placing it over the heat. And this method allows you to influence the frozen crab legs with so much flavor and smokiness. First, to prepare steamed crab legs by grilling, arrange the crab legs in clusters and place each batch in two layers of foil (heavy-duty). Add some tablespoons of butter, and if you want, some aromatics and herbs. Then, heat the grill and place the wrapped crab legs over indirect heat. Cover the lid and let it cook for about 12 to 15 minutes. You can also wrap the frozen crab legs individually, which works when you’re cooking a small amount. In such cases, the legs should cook over the covered grill for about eight to 10 minutes.
By microwaving
This method may sound appalling, but it creates tremendous results with frozen crab legs. The reason is microwave ovens offer an ideal steam-cooking environment, especially for seafood. To use this technique, put the legs in a microwave bag and add a tablespoon of water. Add some aromatics, cover, and place the bag in the microwave. Set it to high and leave it to cook for about three to four minutes.

Grilled crab legs (2 servings)
Ingredients
- Two pounds snow crab legs
Dipping sauce
- Four tablespoons butter, unsalted
- Two cloves garlic, minced
- ½ tablespoon lemon juice, freshly squeezed
- ¼ teaspoon sea salt
- 1/8 tablespoon black pepper
Instructions
- Set the grill to medium or high heat, so it heats to 450F. Next, place the frozen crab legs in clusters of four in a sheet of heavy-duty foil. Pull in and fold the foil ends to seal tightly.
- Place the wrapped clusters on the grill, cover the lid, and let it cook for 25 minutes. The crab legs should steam when you open the foil.
- For the sauce, melt the unsalted butter in a saucepan over medium heat. Then, add the garlic, black pepper, and sea salt. Stir for about 30 seconds, by which it’ll be appropriately mixed and the fragrance pronounced. Then, set down and stir in the lemon juice. Serve alongside the grilled crab legs.
Also, take a look at this video recipe for more directions.