If you’re an ardent fan of the game, venison backstraps are a regular addition to your menus. But for those who aren’t, it’s the meat cut found along the spine region of a deer. Venison backstraps are super tender and offer a unique, appealing, and delicious taste. And it’s why you should up your game when making it so that you can turn out a sumptuous dish with every try.
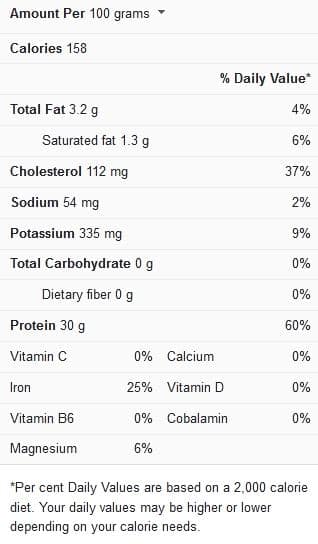
Venison backstraps nutrition facts
Cooking tips for venison backstrap
As impressive as venison backstraps are, many still complain about the result of their recipes. The most common lament is that the meat is dry, or the texture is way off, even more than the typical tenderloin.
But they forget that, like the tenderloin, venison backstraps are soft, lean cuts of meat and require special attention when cooking. But don’t let this condition discourage you; once the steps are followed, anyone can easily prepare it.
Preparing the venison
You get venison backstraps in two forms; either freshly hunted or frozen for sale. And both types require a bit of preparation before the recipe proceeds.
For fresh venison backstraps, it’s Ill-advised to cook the meat as soon as it’s caught. Instead, let it sit for some days, so the juices settle and easily spread when you cook. Venison backstraps should be treated the same way you do roasts, thawed in the fridge for a few hours to days before cooking.
View this post on Instagram
Portion Sizing
Whether you’re portioning the backstraps yourself or buying one at a butcher’s shop, always go for large cuts. Venison excels when the juices are trapped as it cooks and depends on this for a tender chew. But small portions of medallions dry out quickly as they don’t hold heat for long and lose moisture. So, to prevent such from happening, cut or select the meat in six to 12-inch sizes.
Seasoning options
Like all lean meat, Venison backstraps welcome both dry rubs and marinades. And each can contain any blend of spices and herbs you prefer. But when using a marinade, consider olive oil, an acidic ingredient, and sugar. This type is less wet and won’t cut down the heat during pan searing.
You can either add a generous helping of dry rub or soak the meat overnight in a marinade to season venison. For the second option, you’ll have to first pat the meat dry before cooking on stage stop, so the moisture content on the surface is reduced. But if you’re grilling the backstrap, it can be done directly from the marinade bowl.
Cooking methods for venison backstraps
Two main cooking methods are best used for venison backstraps: the pan-searing on the stovetop and indirect grilling on a hot rack. And though they share certain similarities, their cooking processes still have a few distinctions. But note that you’re cooking the meat to a minimum of 140F, taking it down if possible around 130F to 135F (medium-rare).
Stovetop method
Heat butter in a very hot skillet, and then bring the venison backstraps to room temperature. Wipe excess marinade from the surface and pat it as dry as possible with paper towels. Then, sear over medium-high heat for three to five minutes per side, checking for doneness with a meat thermometer. It may seem tempting to move the venison during the searing but only do so at the end of the recommended cooking time (five minutes per side max). You also want to take the backstraps down at 125F, so while they rest, the residual heat will cook them to 130F under five minutes.
Grill method
Prepare the grill to heat and bring the venison backstraps to room temperature. Then, transfer them from the marinade and the rack (no need to wipe, they’ll cook just fine). Roast the venison for five minutes maximum on both sides until the internal temperature hits 125F. Then, move them to a plate and let them sit for 10 minutes so the carryover cooking will raise the temperature to the approved 130F.
View this post on Instagram
More tips
- If you don’t have butter, use any high smoking oil to sear the meat.
- Start with a super hot pan when searing, so the browning is fully initiated. A perfectly crusted venison backstrap will move freely after being seared for as good as five minutes untouched. After that, you can flip it.
- Consider searing the backstrap individually or on a very large pan, so there’s enough space for heat to spread and properly cook them.

Pan-seared venison backstraps (4 servings)
Ingredients
- Two pounds venison backstraps
- Four tablespoons butter
Marinade
- Three tablespoons Worcestershire sauce
- Three tablespoons olive oil
- Three tablespoons soy sauce
- Three tablespoons balsamic vinegar
- Two teaspoons minced garlic
- Two teaspoons honey mustard
- One teaspoon lemon juice
- Half teaspoon pepper
- Half teaspoon salt
Instructions
- Put the backstraps in a shallow baking dish, and mix the marinade ingredients aside. Pour the marinade onto the venison, ensuring it completely covers the meat cover, and keep it in the fridge for 24 hours. Ensure to flip the meat at the 12-hour mark for an even flavor penetration.
- When it’s time to cook, take the meat out and let it sit at room temperature. Then, blot out as much moisture as you can from the exterior. Place a non-stick stainless steel pan on medium-high heat and let it grow piping hot. Then, add the butter, spread over the pan, and add the venison.
- Let the backstraps sear uninterrupted for three to five minutes, or until you notice the crust forming towards the sides. Then, turn and roast the other side until the internal temperature reads 125F on a meat thermometer. Then, take out the backstraps and rest them in a platter for five to 10 minutes, by which the carryover heat would’ve cooked into the final 130F. Then, slice thinly and serve as desired.
You can also click here for more help.